


STEP 1:
Print a photo on fabric paper. (I edited mine in picnik.com, so I could add the year and the holiday border.) I printed this one at 4" x 6" and kept 1/4" of the white border when I cut it out. Peel the paper off the fabric.
 STEP 2:
Cut your background fabric the same size as your photo.
 STEP 3:
Pin the fabric pieces right sides together. You should see the "wrong" sides of the fabric on both sides.
 STEP 4:
 STEP 5:
 STEP 4:
Very lightly hot-glue your cord or ribbon on the top evenly spaced apart, inside of the photo fabric piece. This is how you'll hang the ornament.
 STEP 5:
MAKE SURE you're ribbon or cord is tucked inside the ornament! You should not be able to see it anymore when you go to sew.
 STEP 6:
 STEP 6:
Using a 1/4" seam allowance, sew all the way around with your sewing machine. Yes, you are sewing it shut.
 STEP 7:
 STEP 7:
Using small scissors, cut a 2 inch slit in the back of the fabric side, not the photo side.
 STEP 8:
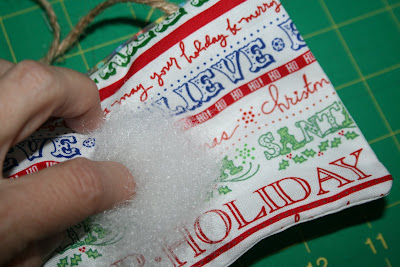
 STEP 8:
Turn it inside out and stuff it just like you would a pillow. (Note: I wish I had stuffed mine a little more. If you stuff it nice and tight the picture doesn't distort)
 STEP 9:
 STEP 10:
 STEP 9:
Using a needle and embroidery thread, sew the slit shut.
 STEP 10:
Cut 1" x 2" inch strips of fabric and batting.
 STEP 11:
 STEP 11:
Make a sandwich with the batting in the middle, and sew an X through the whole piece.
 STEP 12:
 STEP 12:
Hot glue the fabric sandwich over the slit that you sewed shut, and sew a cute button right in the middle. Your done!:)
 Now hang or give as a gift.

I know there are a lot of steps shown but it's pretty easy. Once you make one, the rest will be very fast.:)
 Now hang or give as a gift.
I know there are a lot of steps shown but it's pretty easy. Once you make one, the rest will be very fast.:)
I'm linking up to:
and
11 comments:
That is just stinkin' cute! And a great tutorial as well...thanks for walking us thru step by step :)
Glad you linked up to Mi4M!
Oh they are adorable, so are the ornaments!!
Wow, this is awesome! Very cute!! :)
Good day !.
You may , probably very interested to know how one can make real money .
There is no initial capital needed You may start to receive yields with as small sum of money as 20-100 dollars.
AimTrust is what you thought of all the time
The firm represents an offshore structure with advanced asset management technologies in production and delivery of pipes for oil and gas.
It is based in Panama with structures everywhere: In USA, Canada, Cyprus.
Do you want to become a happy investor?
That`s your choice That`s what you desire!
I`m happy and lucky, I started to take up real money with the help of this company,
and I invite you to do the same. It`s all about how to select a correct partner utilizes your money in a right way - that`s it!.
I take now up to 2G every day, and what I started with was a funny sum of 500 bucks!
It`s easy to start , just click this link http://nozevyxy.freewebsitehosting.com/fehaqe.html
and lucky you`re! Let`s take our chance together to feel the smell of real money
Thanks for showing us the cutest ornament ever! Your kids look so adorable in that picture! I haven't had a printer for over a year. I actually have a printer but in the move I've lost the cord. This makes me want to go buy a cord so I can do this!
Oh wow that's so incredibly cute, and what a great keepsake, perfect gift for grandparents!
They turned out great! Thanks for showing us how!
i loove that!!
Great job! Really adorable ornament, but of course what really makes it beautiful are your cute children :)
That is great!!
That is so very cute. I love it.
Ruth
Post a Comment